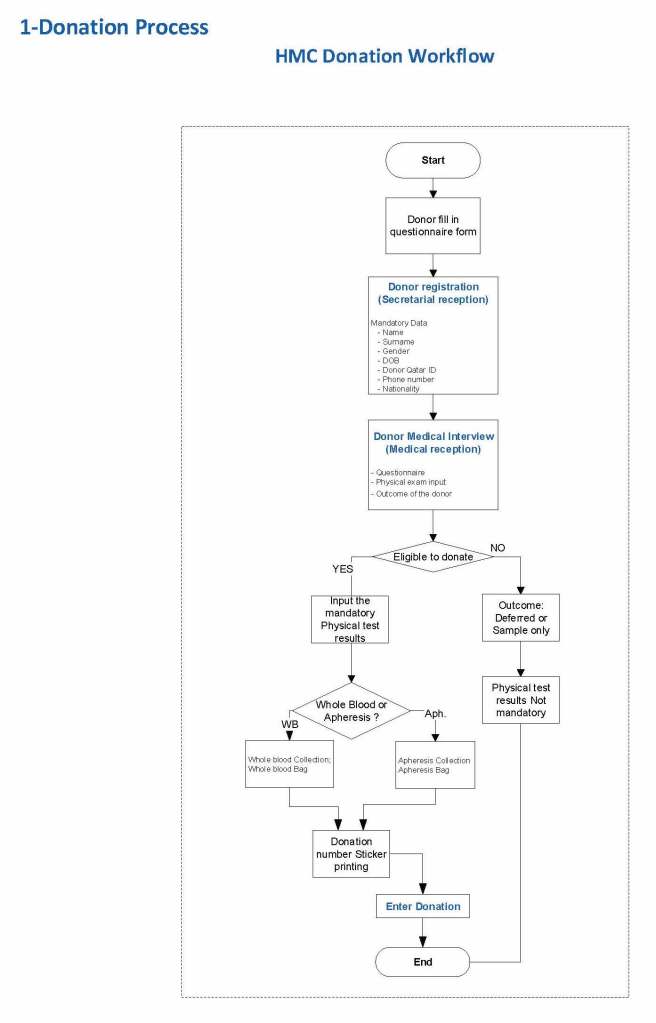
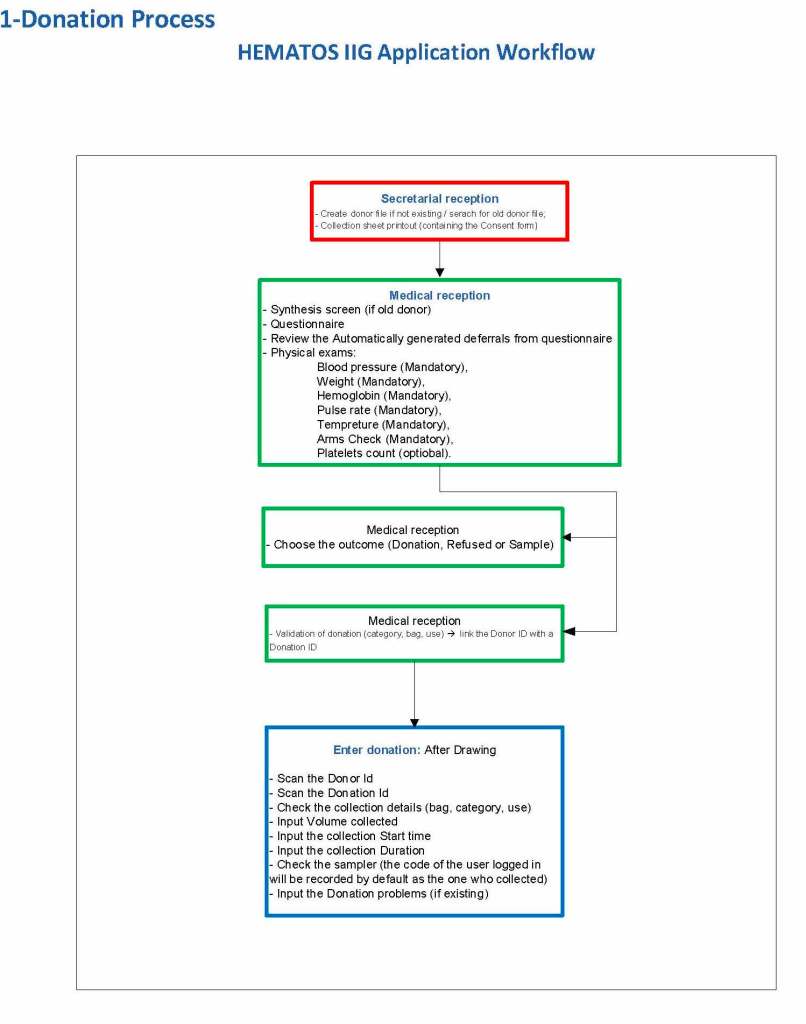
This is a first is a series of detailed posts of how I collaborated with Medinfo (Nice, France) to build customized donor software for both Saudi National Guard Health Services and Hamad Medical Corporation Doha.
In particular, we were using a non-turnkey software which could be built to order. If we didn’t know what we were currently doing, how could we build something better?
At both sites, we had good manual systems in effect and prepared detailed mapping of the current state. We reviewed our variance reports to see where we needed to bolster the system and improve the critical control points.
We studied the software options and prepared a draft Medinfo future state from which we started to build the system. We did this in small stages so we could test it and adjust our settings as needed—without being charged extra (unlike a general laboratory software I had been working with at the same time, which always charged an arm and a leg).
To do this, I engaged early a team of my most computer-literate staff to work as Super Users. In the Donor Center, this consisted of nurses and technologists.
In accordance with the College of American Pathologists’ accreditation standards, all report structures (content, formatting) are reviewed at least biannually and upon modification by staff designated by the Chairperson, DLMP, here the Division Head, Transfusion Medicine/Laboratory Information System.
Policy:
Responsibilities:
The Chairperson, DLMP is ultimately responsible for the report formats, electronic and paper (if applicable) across all areas/divisions/sections of the department.
The Chairperson, DLMP delegates the responsibility for this review to the Head, Laboratory Information Systems LIS.
The Head, LIS reviews/approves the final reporting formats after review/acceptance of the formats by the Division and Section Heads for their respective areas.
Content of the reports:
Headers and footers as required, especially for paper reports
Headers will include full patient name and a unique alphanumerical identifier, age, location, sex, date of testing/reporting, location, and ordering physician.
Footers will include contact information for the site performing the testing and for the Chairperson, DLMP.
Body of the report will include:
Test results
Flags
Reference range
Order and result comments
Corrected/amended/appended results will be clearly marked, including any changes from the initial reports.
Documentation of Review:
Screenshots (electronic) or printout (paper formats) will be collated for one example of each test and reviewed by the Division/Section Heads and documented with a signature/stamp for each test result.
Upon acceptance by the Division/Section Head, a cover letter summarizing the acceptance will be signed, stamped, and dated.
The completed documentation will then be submitted to the Head, LIS for final review and approval.
Reference:
GEN.41077, Content/Format Report Review, CAP Checklist, Current Edition
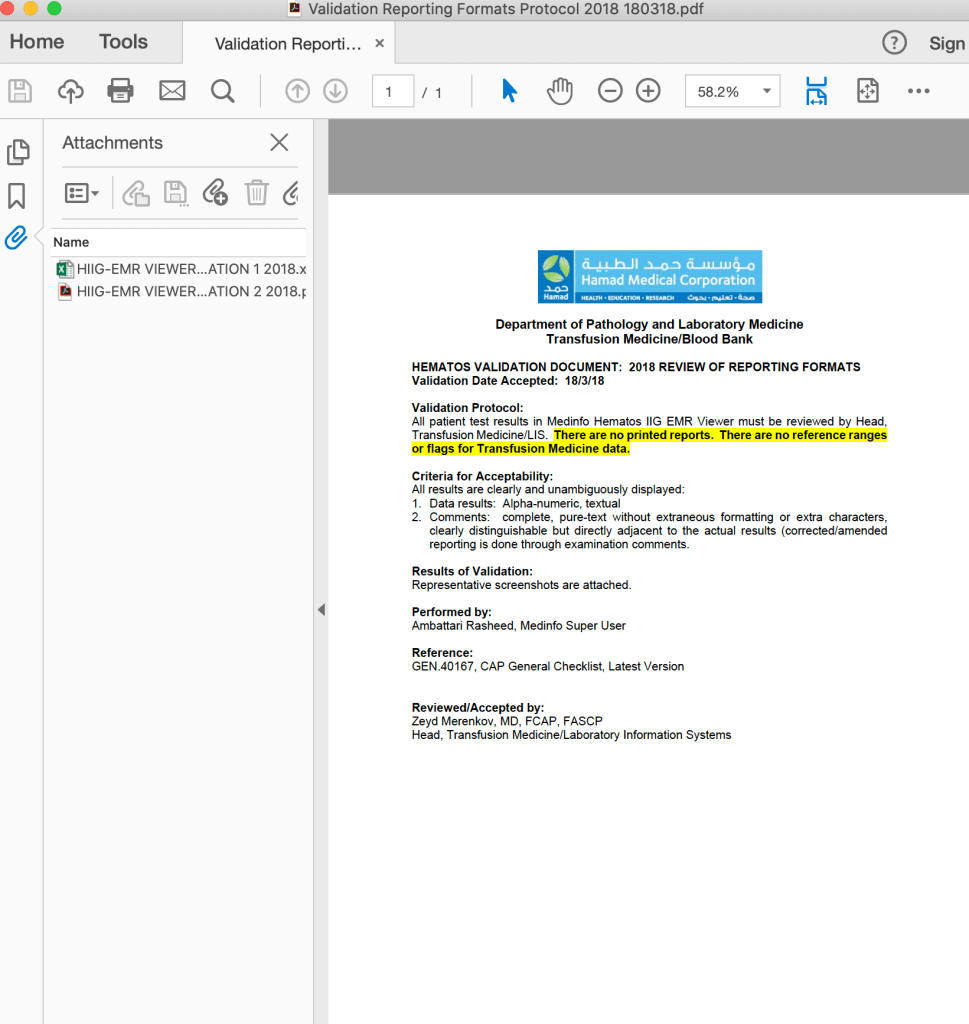
The following is a sample report I prepared during my tenure at HMC Doha:
On the left-hand side of this composite PDF there are embedded attachments, which can be accessed by clicking on each one. In this document, I have shown a sample page from the actual screenshots generated. The data showing is a dummy test patient (no real patient data is exposed).
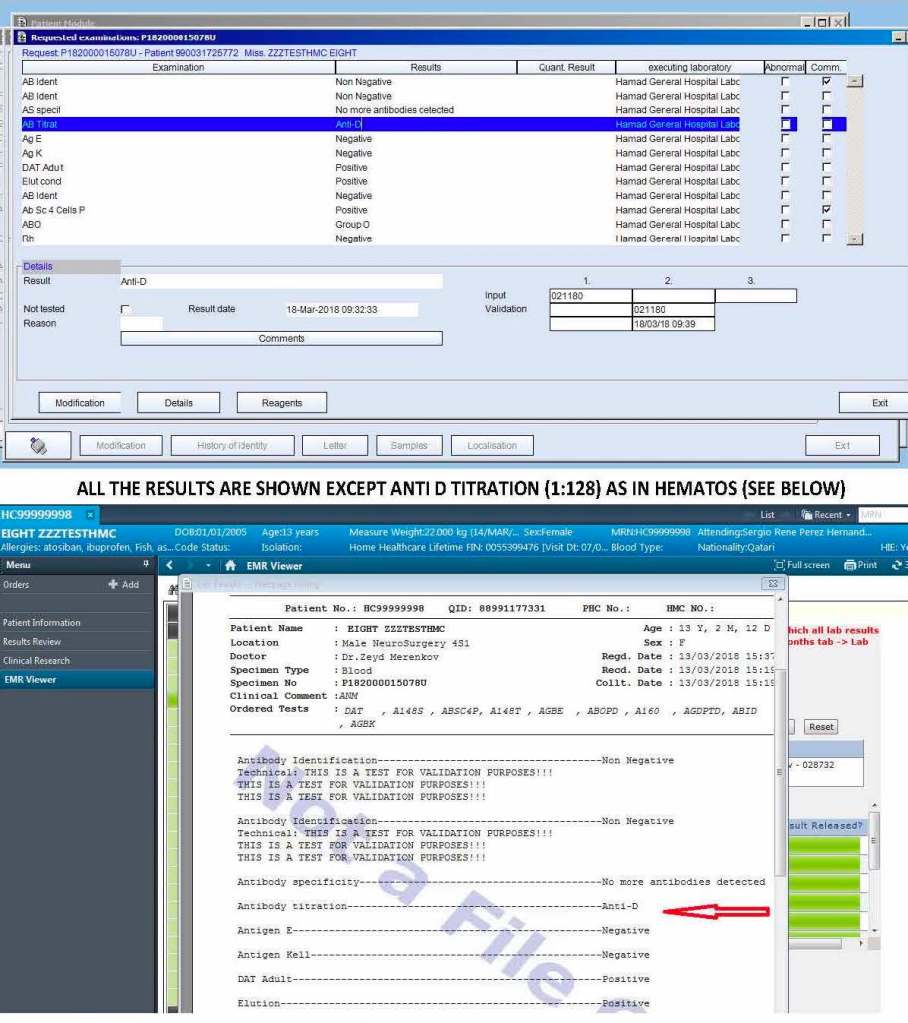
Note that our design of Medinfo did not include printing copies of reports. The only available reports were the screens. Staff outside Transfusion Medicine viewed the blood bank reports through a separate database viewer. In the example below, the Medinfo screen appears first followed by the EMR Viewer report.
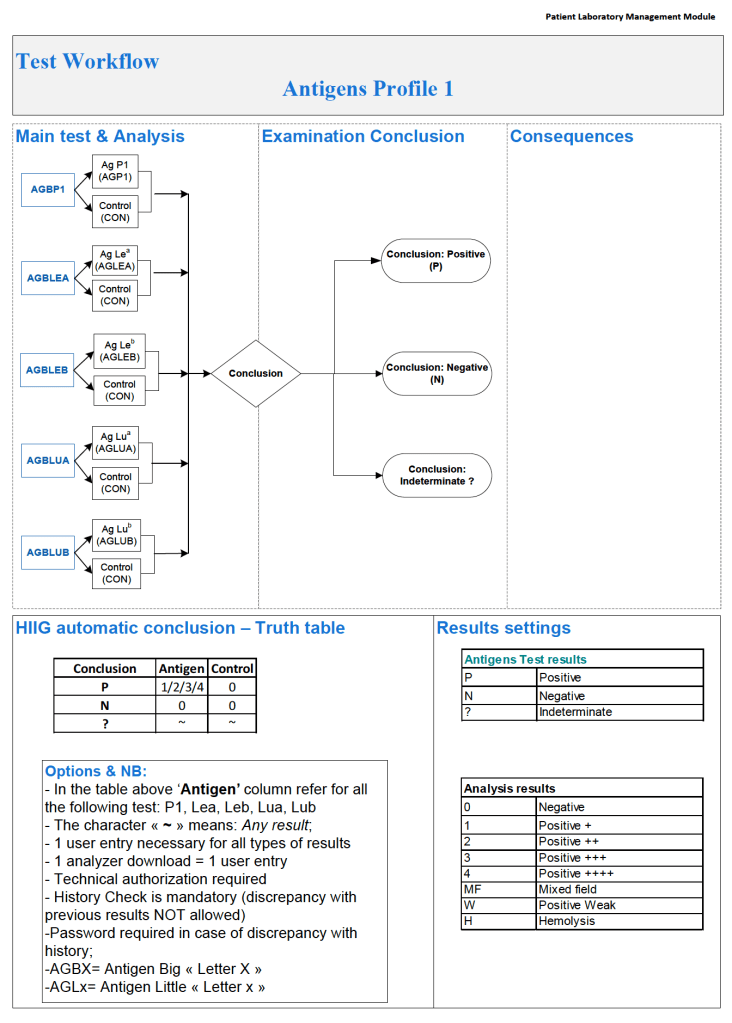
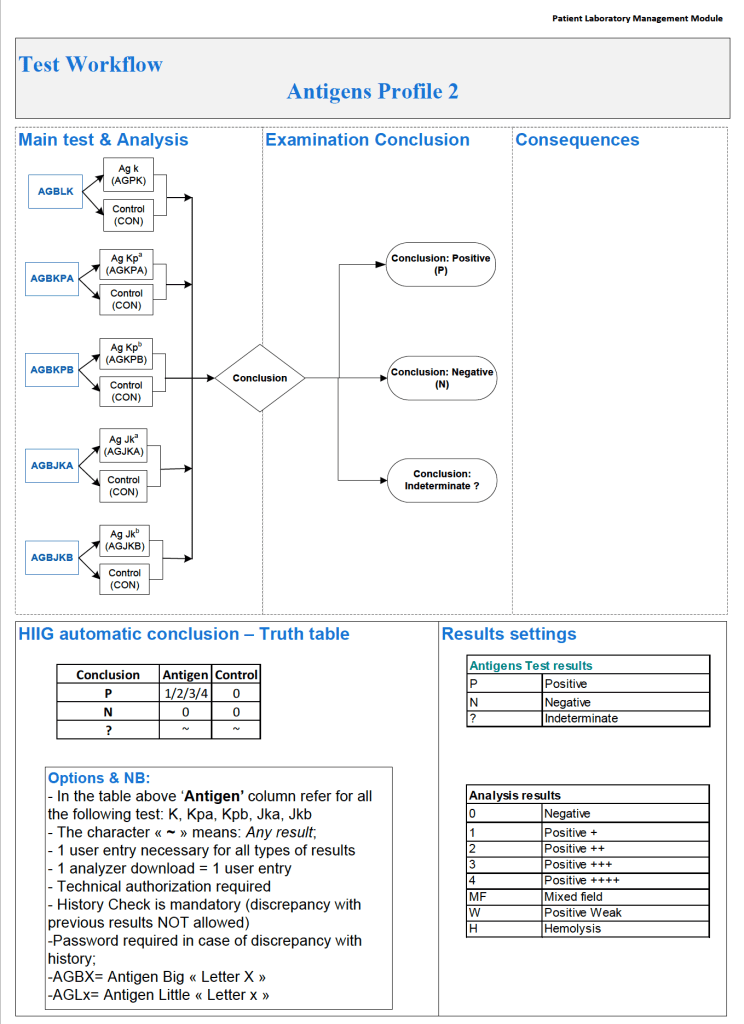
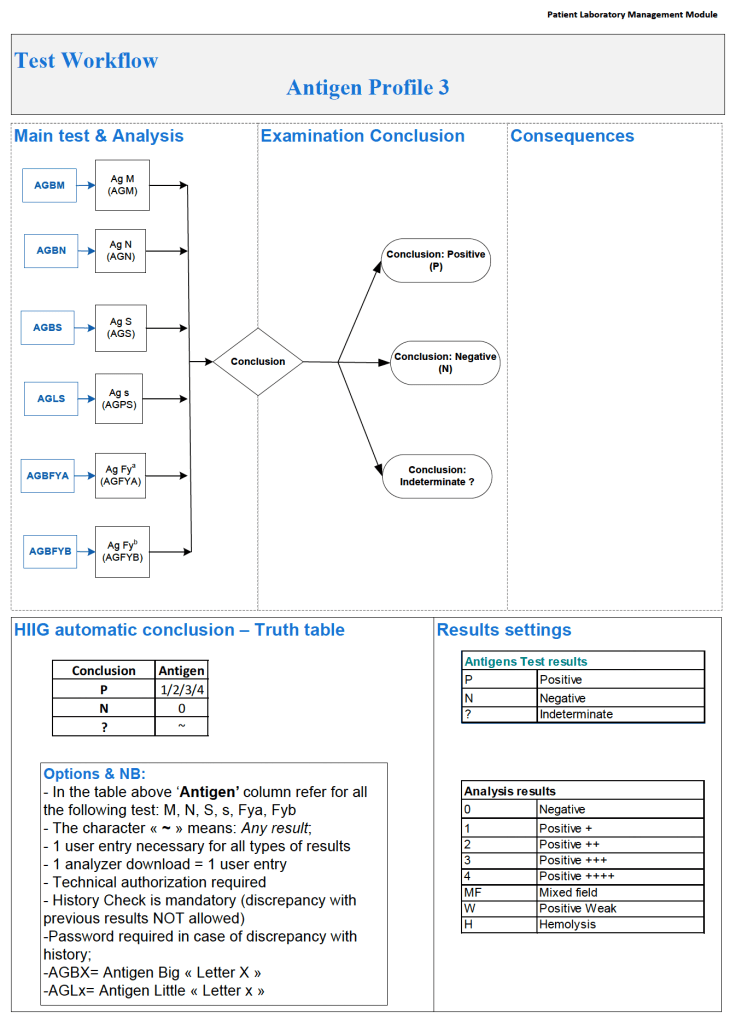
In any case with nonspecific antibodies and for all new patients who will require chronic transfusions, I perform extended Rh (CcEe)/Kell and the three Diamed (now Biorad) profile cards.
It is very easy in Medinfo to write a process for any group of antigen typings as long as you know the manufacturer’s criteria for accepting results. Some cards have controls, others do not. In the latter case, the “control” is a negative reaction in the card or series of cards of the same type.
In Medinfo, one can also look for errors in using the card: In Profile Card 3, i.e. the MNSsFyaFyb card, one must reject the card if no reactions in any well appear: Did the technologist forget to add the cells or reagents? Did he/she use the wrong diluent (i.e. bromelin enzyme) which would destroy the labile antigens?
One can set the acceptable range of reactivity, flag for mixed field, etc. and record these findings in the official record. One can define which reactions you will accept an automatic reading of the card. For the other readings, one can force a manual review and result entry.
Note that Profile Cards 1 and 2 both have an internal control whereas Profile Card 3 (enzyme-labile antigens) does not.
Here are the processes for all three profile cards:
Immediate-spin crossmatch ISXM is an abbreviated compatibility testing that detects most ABO incompatibility. AABB Standards restricts its use to specific situations as indicated in the Policy section below.
Policy:
Applicability:
ISXM may only be used when ALL of the following conditions are met:
Negative antibody screen
No history of antibodies
No ABO/D antigen typing discrepancies
Less than two (2) ABO/D determinations are on-file.
Use the computer/electronic crossmatch whenever its specific criteria are met.
Testing:
ISXM consists of reacting an RBC suspension with patient/serum or plasma, centrifuging, and immediately reading for agglutination or hemolysis. THERE IS NO INCUBATION STEP, NO USE OF ANTIHUMAN GLOBULIN AHG REAGENT.
If any hemolysis or agglutination is detected, the crossmatch is incompatible:
Repeat the ISXM.
Repeat the patient ABO/D AND unit ABO/D typings.
Repeat the antibody screen.
Perform full AHG crossmatch AND AHG/enzyme antibody panels.
Refer the case to senior technical staff or a Transfusion Medicine consultant for further instructions.
Case review will be documented in Medinfo HIIG computer system.
DO NOT RELEASE THE RBCS UNTIL SO INSTRUCTED BY SENIOR STAFF.
References:
Technical Manual, Current Edition, AABB, Bethesda, MD, USA
Standards for Blood Banks and Transfusion Services, Current Edition, AABB, Bethesda, MD, USA
Guidelines to the Preparation, Use, and Quality Assurance of Blood Components, European Committee (Partial Agreement) on Blood Transfusion (CD-P-TS), Current Edition
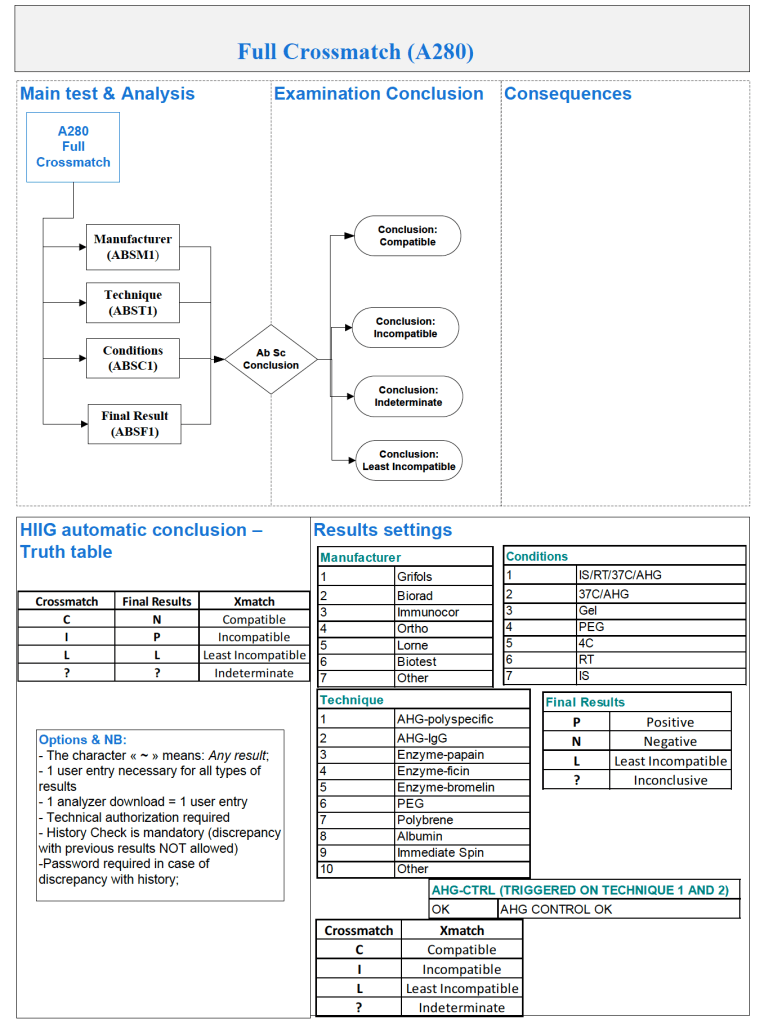
The antiglobulin phase crossmatch is the same indirect antiglobulin test IAT used for antibody screening, only instead of reagent RBCs we use the donor’s RBCs. One question I like to ask my students is to describe the difference between the IAT and the antibody screen. Most don’t realize they are the same thing, the same procedure, i.e. mixing plasma/serum with RBCs and then detecting a reaction using the AHG reagen
In Medinfo, the AHG phase crossmatch will be required unless the criteria for electronic crossmatch have been met (see my previous post on this topic). In emergency mode, one can also do a class II release using immediate-spin to detect ABO incompatibility. Medinfo will check the historical records for previous antibodies.
Notice that the process includes contingencies for room and even lower temperature conditions as well as immediate-spin.
I warn my students that we can make any tube, gel or glass-bead well react if we do not strictly adhere to the manufacturer’s recommendations. The simplest example is to leave the reaction mixture to incubate longer than the time limit for LISS (e.g. 60 minutes).
If the antiglobulin phase crossmatch is positive (i.e. nonnegative reactions), then the unit is rejected or a least-incompatible crossmatch mode is activated. The latter requires the transfusion medicine physician to specifically approve the allocation and release of this component.
My practice across the globe has exposed me different rationales to performing antibody titration. In my American training and practice (and also at international institutions following the American version of AABB accreditation), I only routinely performed titration of anti-D for Rh(D) hemolytic disease of the newborn and anti-A/anti-B for ABO-incompatible stem cell transplants AND ABO-incompatible renal transplants.
I have had heated arguments with some physicians who insisted they wanted titers for other antibodies. The AABB Standards do not require this but leave it to the discretion of the Transfusion Service Medical Director.
In my entire career, I never worked in a blood bank or blood center which had optimal staffing or resources. I focused on what was medically/technically necessary and even then still had shortages. If performing a test will not change the clinical treatment, why perform it unless you are doing a research project!
Titration is a time-consuming, and until recently, a tedious manual task. Recently some of the automated immunohematology analyzers offer a titration program. We used the Ortho Vision Max which could perform both IgG and IgM titers within one hour—walk away!! However, during that time, the titration procedure monopolized the analyzer.
The ABO-incompatible renal transplant program at HMC Qatar was modelled after Sweden’s Karolinska Institute. However the latter site performed manual IgG and IgM titrations using Biorad/Diamed gels.
I did not have sufficient resources to commit staff to manual titration at HMC so I did a comparison study between the Ortho Max and the Biorad methods. We were able to get good correlation and used the automated method for the transplant.
I am still biased against performing titrations for other antibodies. I always ask, ‘Does the titration correlate with clinical severity?’ Unlike anti-D, antibodies such as anti-Kell and anti-c may be low titer but cause death. Can anyone show me a definitive study that titers are useful except for transplants and Rh(D) hemolytic disease of the fetus/newborn?
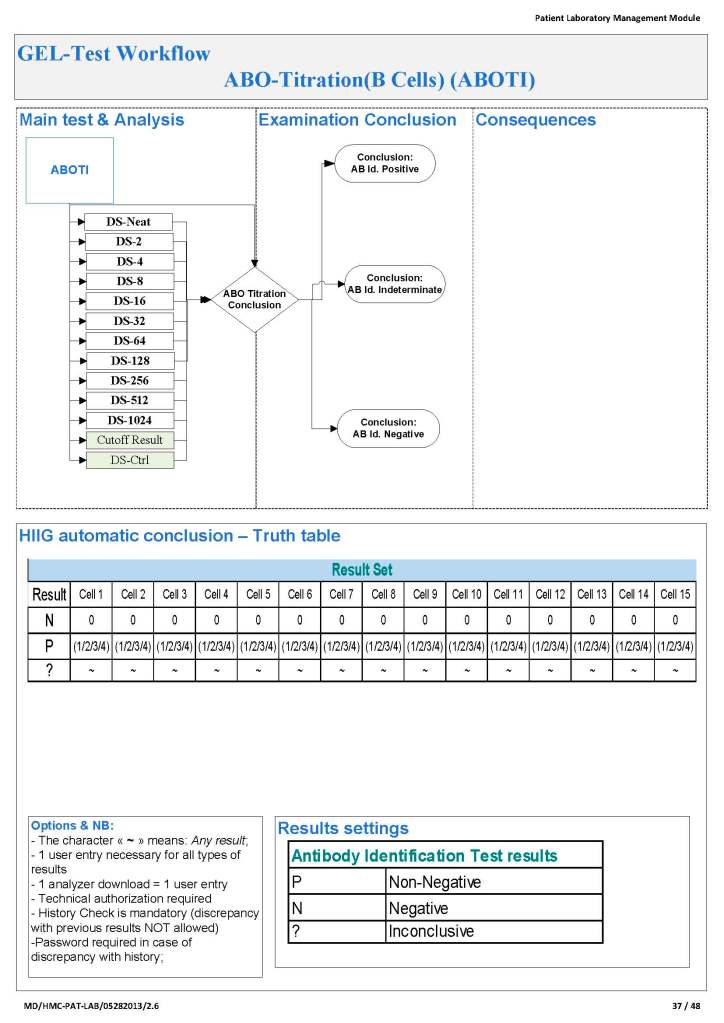
Since the method was working well on the Ortho equipment, I next established an interface to Medinfo. The test was performed separately for IgG and IgM antibodies. Medinfo recorded the reactions in all the wells. The last well showing a 1+ reaction was interpreted as the titer (e.g. if 1:64 were the last 1+ reaction, then the titer was 64 in Medinfo).
Medinfo software is rules-based so the institution may set its own custom rules for all processes. One chooses a framework and then adds any additional rules it needs for optimization. Turnkey systems do not offer this flexibility.
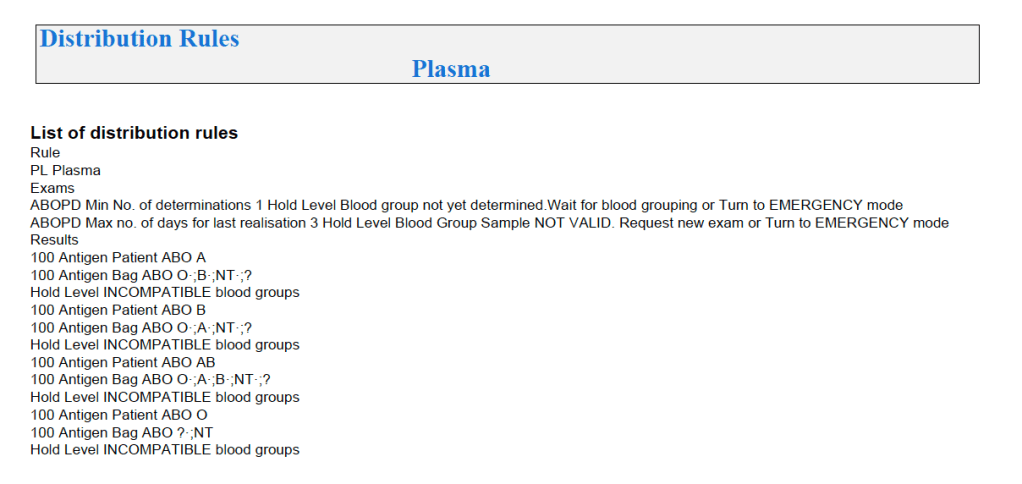
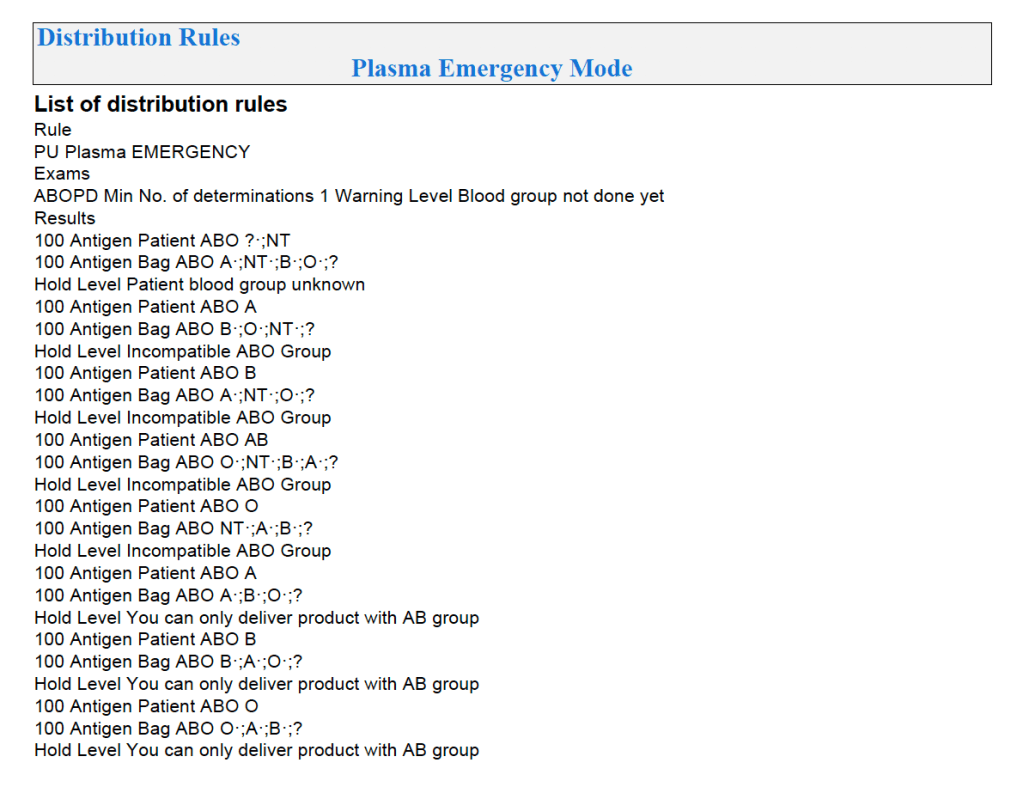
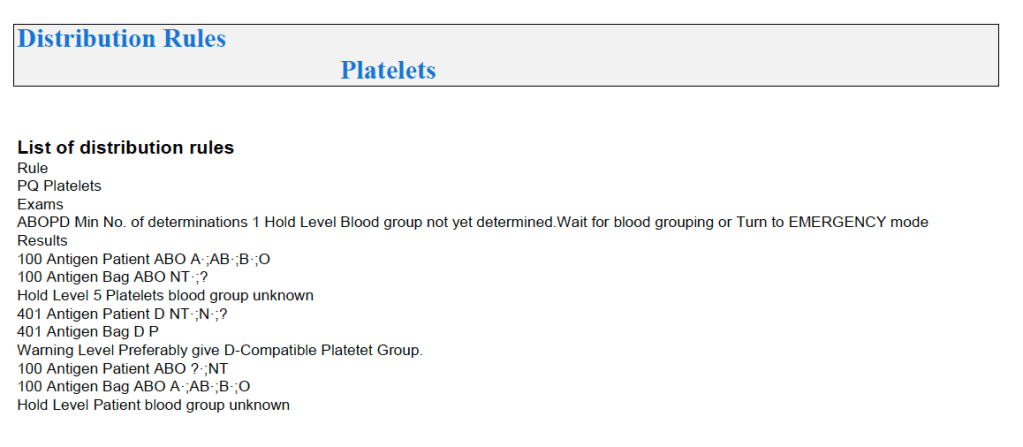
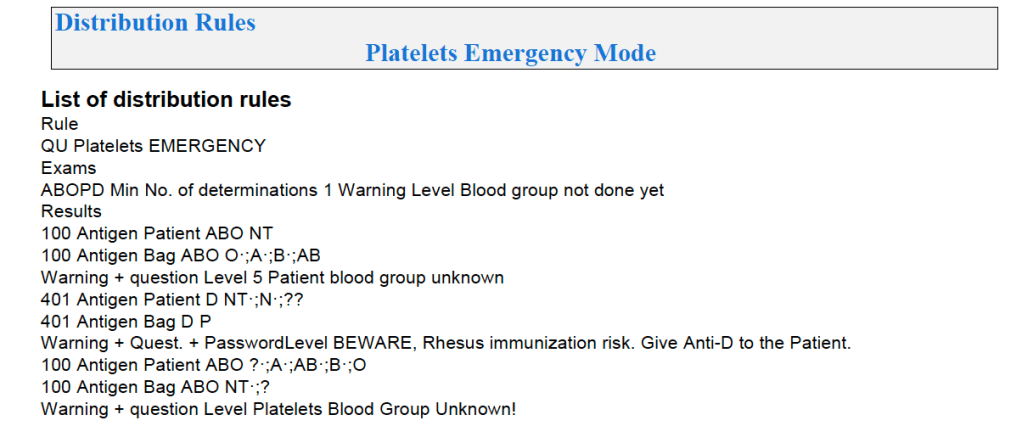
The rules for platelet and plasma components are much simpler than those for RBCs since usually we only consider ABO type. There are two modes: regular and emergency, the latter applying if not all the patient testing (including historical checking) is available. The components, on the other hand, must meet all criteria before being considered for patient use.
Example rules for plasma follow:
For platelets, note that for adults and anyone else >= 20 kg, I gave any type of platelet pool or plateletpheresis component without regard to ABO matching. With our production method, I did not give Rh immunoprophylaxis to females of child-bearing age receiving platelets from D-positive donors based on our clean (essentially RBC-free) Reveos automated production process.
Similarly, allocation rules for granulocytes, etc. could be made and enforced by the software. Low-B-titer group A universal plasma would also be easy to implement.
In the previous post I outlined how Medinfo handled antibody screening and identification. This post reviews how antigen matching is used based on these results.
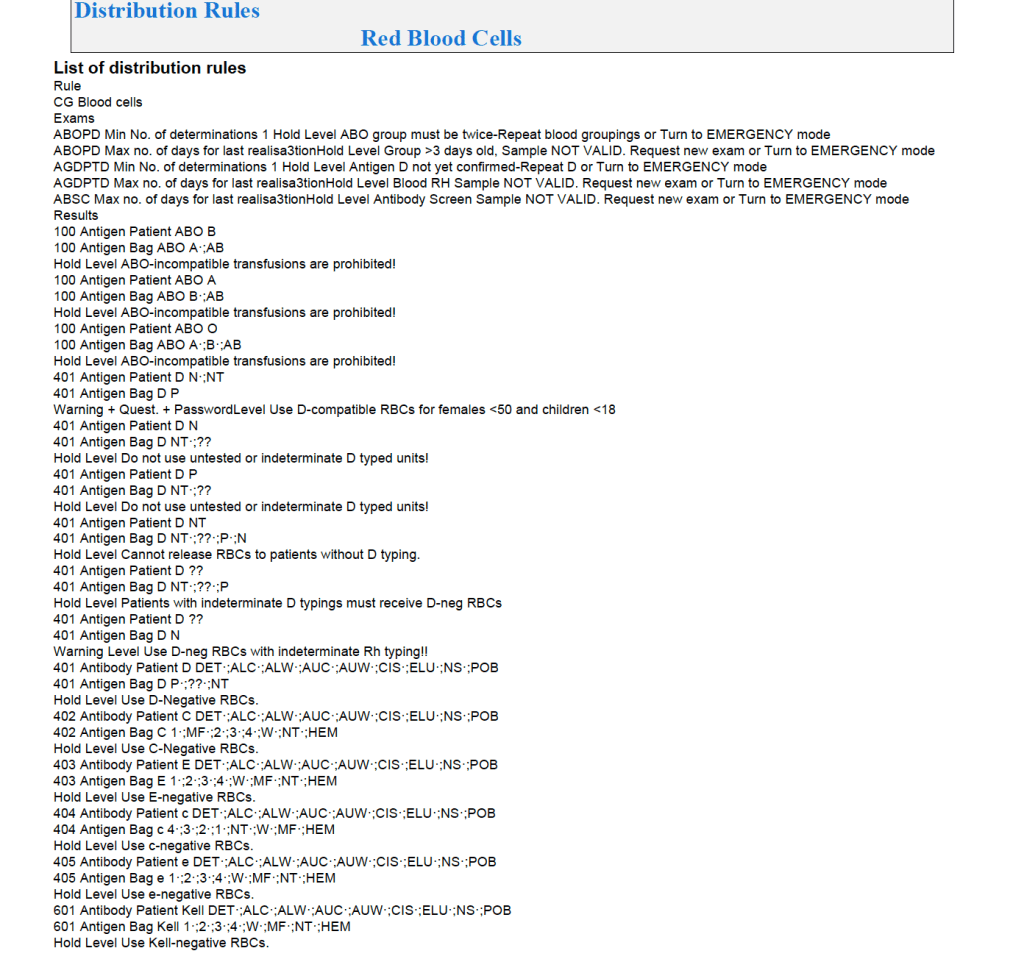
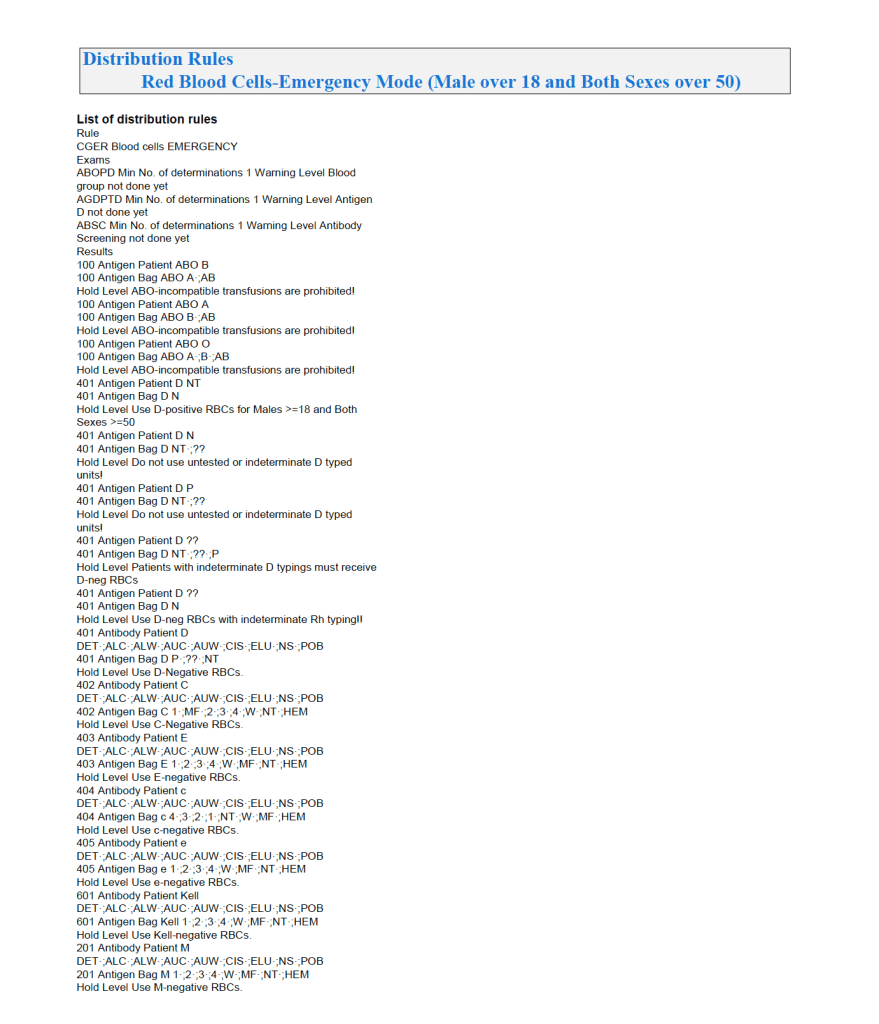
There are two modes, regular and emergency. If the patient has not had at least two ABO/D determinations and/or does not have a recent antibody screen, then emergency mode must be selected with its own rules. Otherwise, the regular mode applies.
Regular Mode:
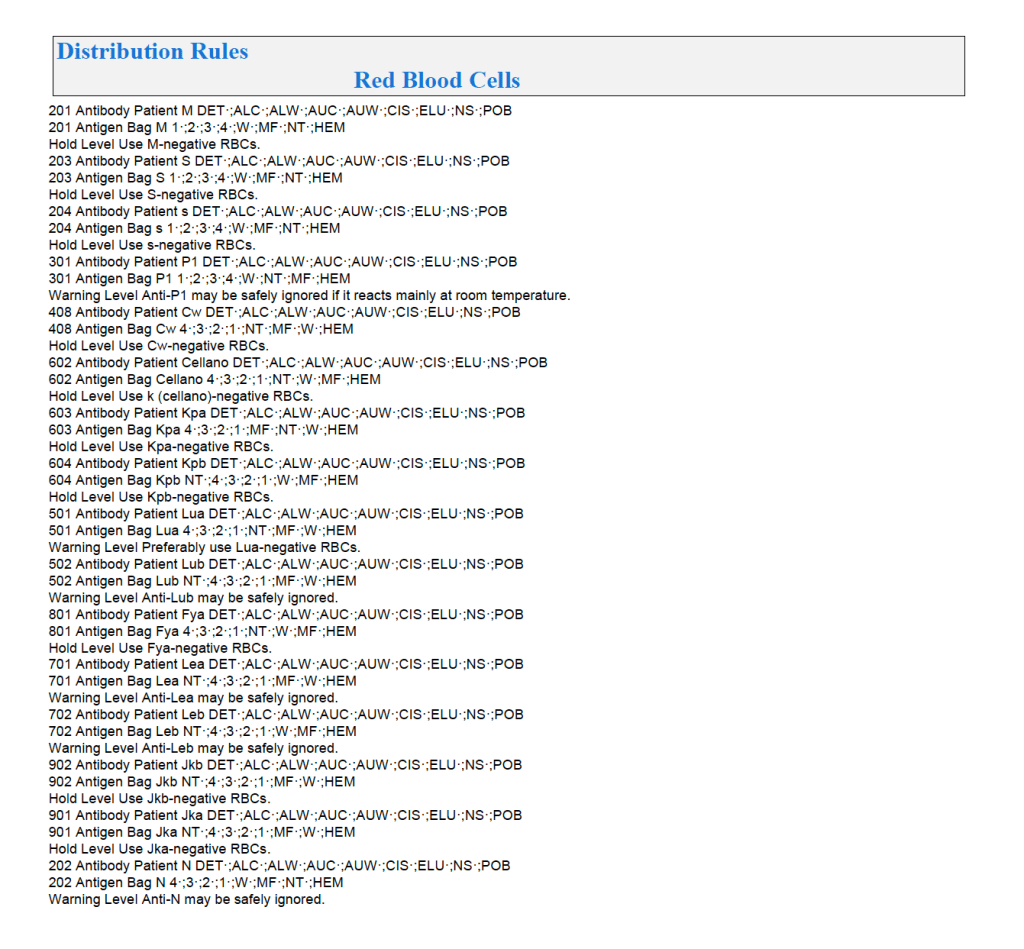
In general, if there is a clinically significant antibody, an RBC unit which has not been matched for the corresponding antigen or has the corresponding antigen cannot be routinely selected. However there is a hierarchy here also:
Absolutely prohibited release—no one can override the logic (e.g. giving group O to a patient with anti-H)—not even the transfusion medicine physician can override this
Restricted release—only certain staff can release the incompatible or untested unit (e.g. giving C-positive unit to someone with anti-C)
Least-incompatible for WAIHA: requires transfusion medicine physician approval
Informational release: authorized staff may release antigen-incompatible or untested unit but a pop-up menu appears and asks them to accept (e.g. Lewis untested unit in a patient with anti-Lea).
Antigen-specificity matched—the usual mode for patients with antibodies
Examples of Regular Mode rules follow (these are not the complete lists but just provided to show the complexity of the process).
Emergency Mode:
This is much more restricted for selection of ABO/D and other antigen typings. An example follows:
A similar hierarchy exits for platelet and plasma allocation and will be considered in a future post.
The blood bank is one of the last bastions of manual testing, especially for complex procedures. Basic antigen typing, direct antiglobulin tests, and antibody screening adapt well for routine automation, but the actual antibody identification requires multiple methods and requires considerable experience to complete. At least today, a machine cannot replace the blood banker!!
One could take the approach to perform antibody panels in an automated system and record the results. However, these are worthless unless you have the actual panel in hand. Artificial intelligence to analyze the panel results is limited. You still have to manually review everything. In Medinfo, we could also scan the manually performed panels and add them to the record.
While I was at HMC, some of the hospital transfusion services elected to run panels automatically and then review the results manually. We prepared a contingency to record the panel results but these by themselves could only be used with the actual red cell panels in use.
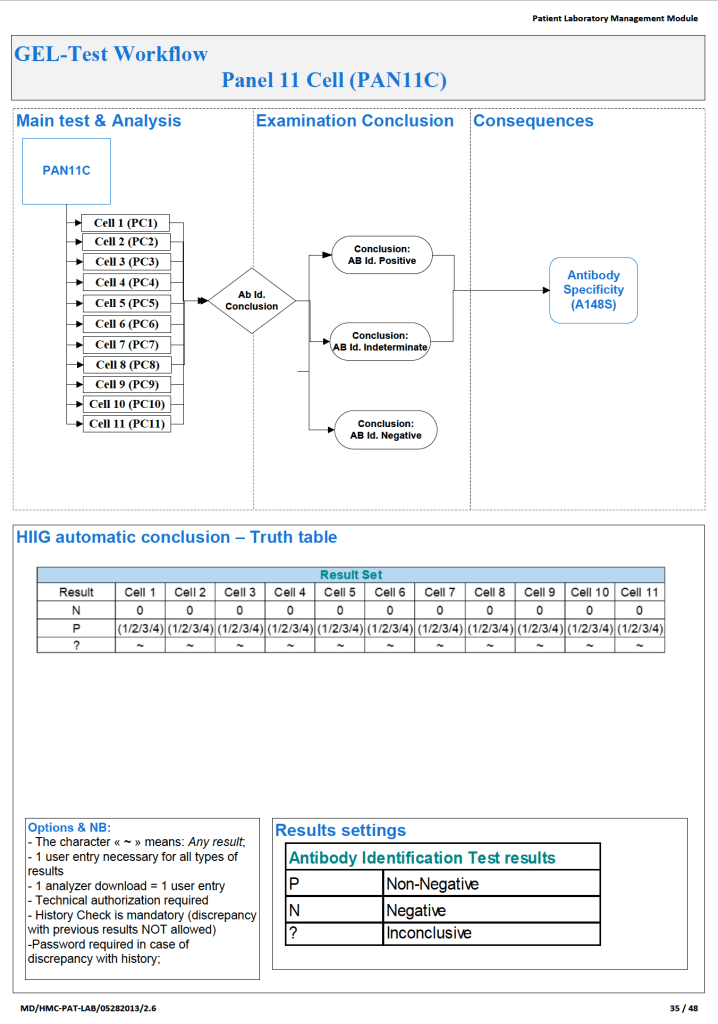
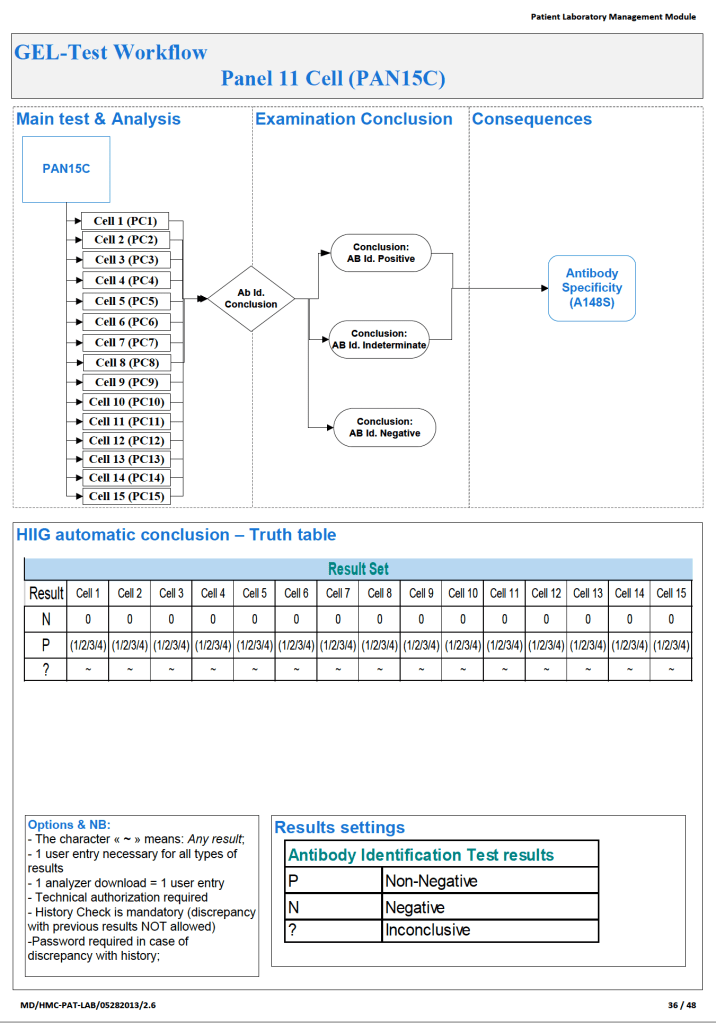
Examples of 11-R and 15-cell panel result importation follow:
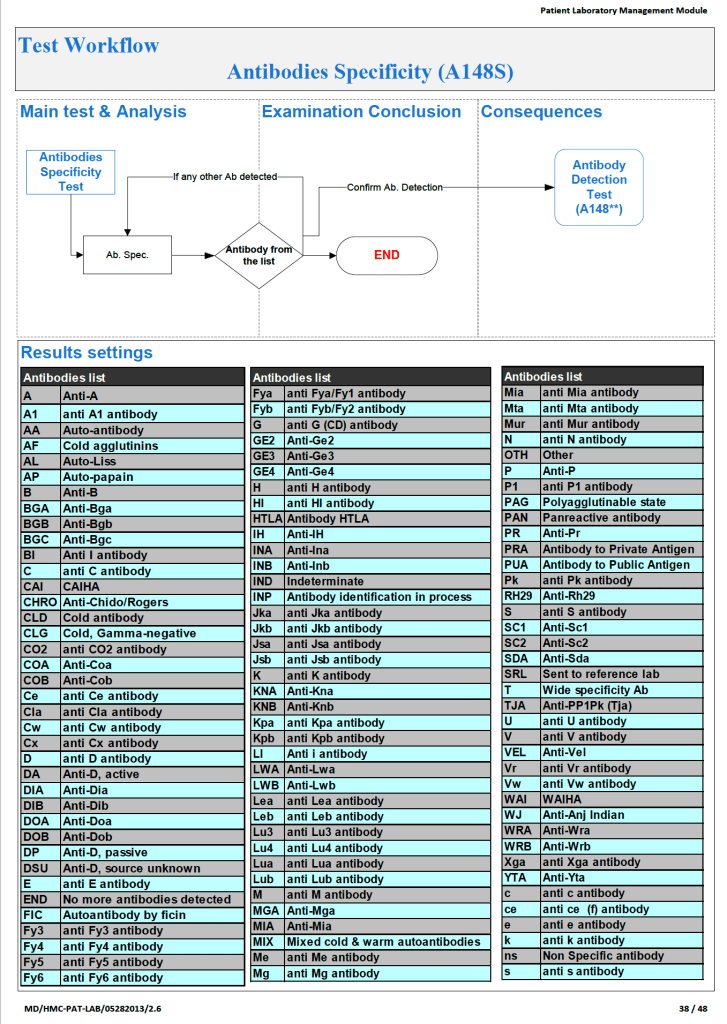
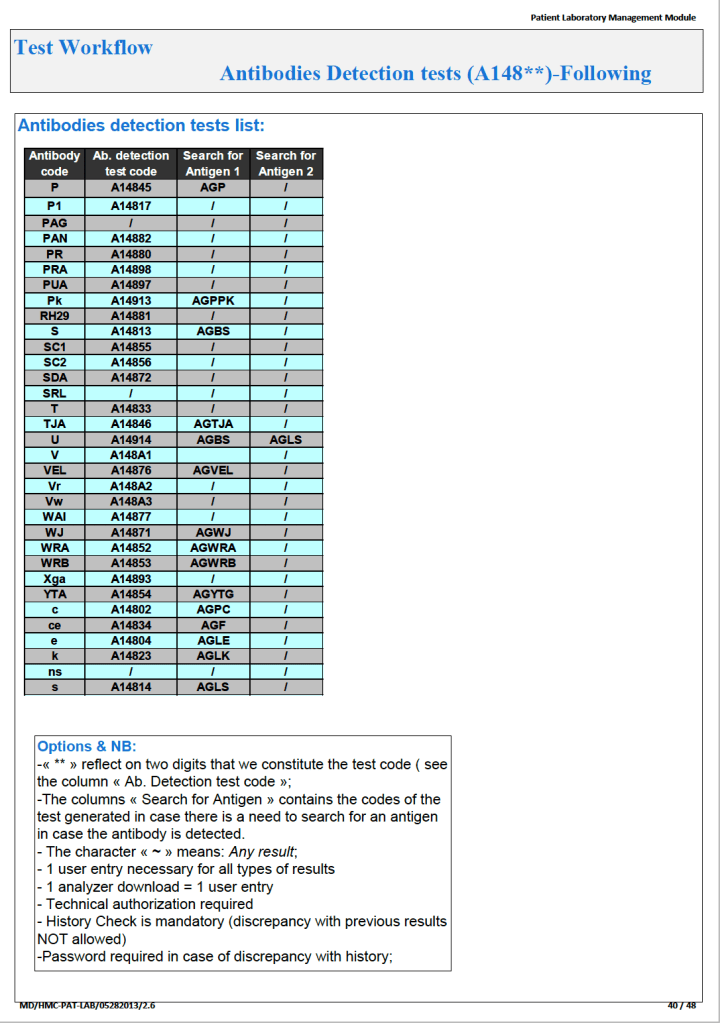
What we absolutely had to do was enter the antibody specificity in a way that it could trigger our algorithms, i.e. our rules-based system of RBC allocation according the permissible blood types. Each antibody specificity and each antigen typing had its own unique code. It could not be entered free text! Workflows follow:
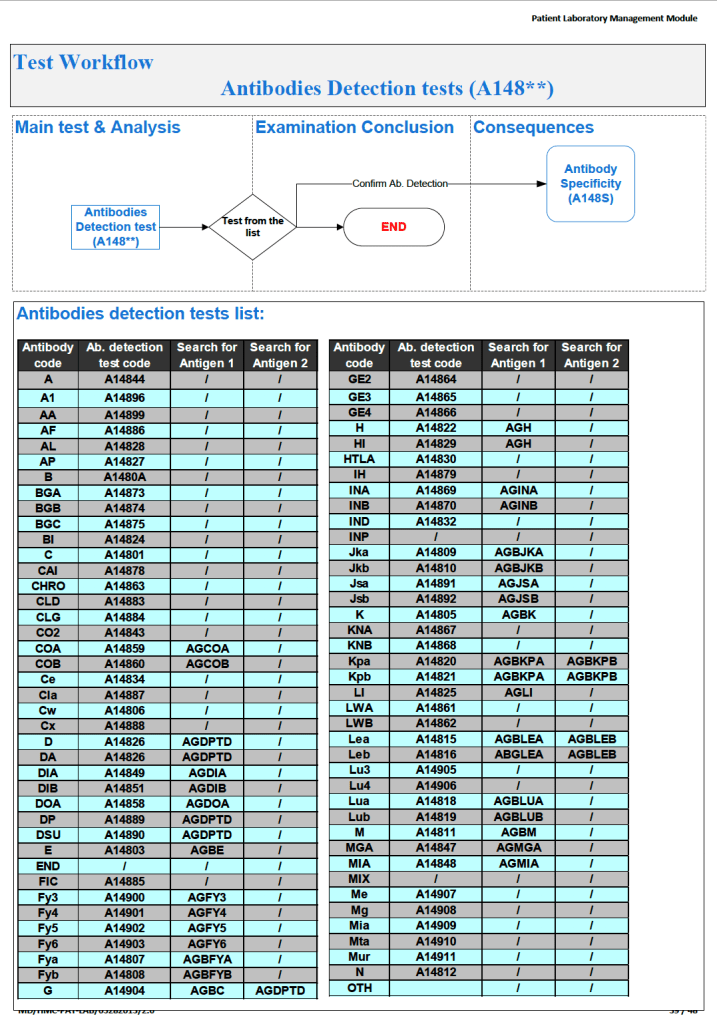
Next, the antibody specificity test would trigger antigen typings for the correspond antigen and/or closely related antigens:
Based on the antibody specificity and antigen typings, a whole series of rules for routine and emergency-mode release were triggered. This will be discussed in a subsequent post.
The direct antiglobulin test DAT may be the first or last place that a delayed hemolytic transfusion reaction can be detected. In my practice, I always performed it the first time I encountered a patient with a positive DAT. If the subsequent DAT testing is of the same strength and there is no change in the clinical status of the patient, then I might empirically repeat the elution after 14 days, i.e. just when new antibody emergence may be detected.
In summary, my criteria for elution after a positive DAT are:
First patient encounter with a positive DAT
At least 14 days since the previous elution
DAT strength has increased since the previous exam (at least 1+ increase in strength in either IgG or C3)
Patient shows evidence of hemolysis
Suspected cases of drug-related hemolysis
Transfusion Medicine physician specifically orders it otherwise
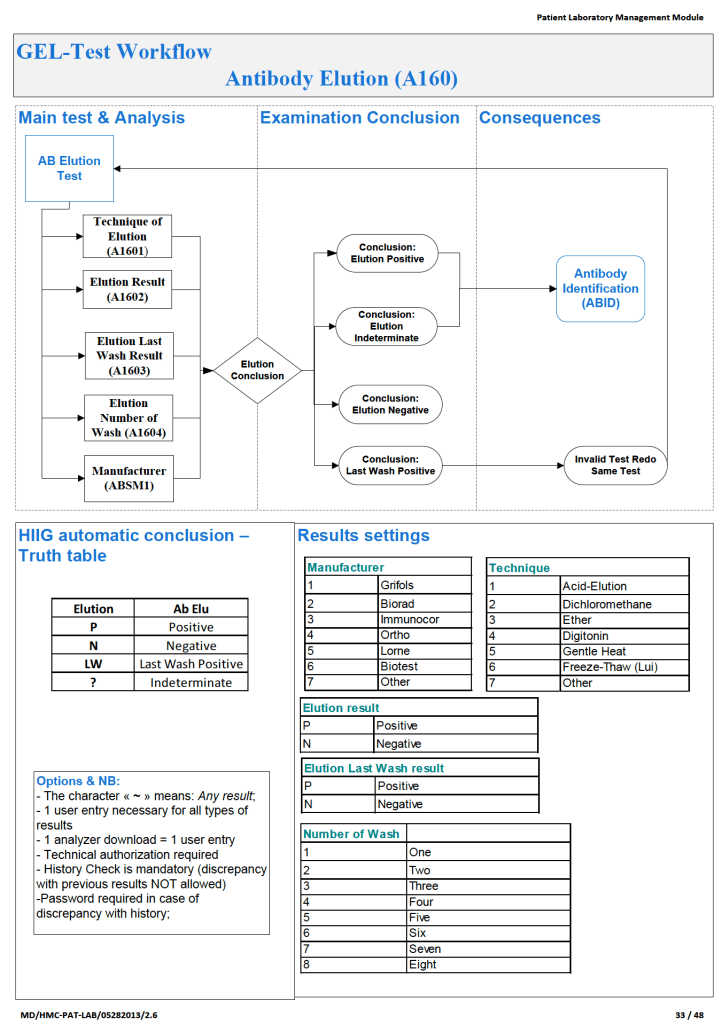
In the software processes, the following parameters were recorded:
Technique of elution (acid glycine, dichloromethane, digitonin, ether, etc.)
Number of washes (too many may remove the antibody from the RBCs)
Last wash result (must be negative to accept conclusion)
Manufacturer of the elution kit (if any)
Elution result based on panel testing
Note:
All indeterminate or positive eluates would trigger an antibody identification.
All results would be reviewed by me or the covering Transfusion Medicine physician. A comment would be entered into the results that could be viewed by the clinician either directly from Medinfo or through the hospital information system.
If the DAT was only positive for complement, it was up to the Transfusion Medicine Consultant to decide whether to proceed with elution. Personally, I would usually proceed because the eluate is more concentrated and may occasionally detect an antibody that was not noted in the patient’s plasma.
The attached Medinfo workflow shows the process designed by me for use at HMC Doha.